About Us
Club Contacts
Junior Shooters
Upcoming Activities
Recent Activities
Member Ramblings
Books and More
Range Rules
Range Schedules
Useful Links
Website Policy

Behind the Scenes at NOSA's Website
(Technical Tips)
Updated February 2021 -- Banacek
The subjects here will include technical tips about digital photography and the nuts and bolts of making a website. I try to simplify my work and be both economical and practical. The information here is intended to be helpful to amateur photographers in general, or provide practical tips for a shooting club webmaster, or help a webmaster in any organization.
Note: This page may be updated often/sometimes/never as changes occur in running the website, and I am bored/sick at home and have nothing else to do, like when stuck indoors with a nasty cold. So you might check back periodically, especially if you see stores are running out of tissues :-(
This particular page is likely going to be read by only a very few curious people, who perhaps should find more meaningful stuff to do with their all-too-short lives ;-)
If you're still here, it's just possible that you will find something you can actually use to improve your photography or make better web pages.
Pictures for Webpages (or for fun too)
Here I'll run through the processes (how and why) I used for better pictures taken at recent club events.
Taking Event Pictures. All memorable events are once-only opportunities. The digital camera excels here as a great many pictures (at no cost) can be taken in short order. Multi pictures of any one thing/action can be taken to ensure getting one good picture of a perhaps priceless moment. Many are taken, only the best are used.
A Problem of Smoke. The Club Appreciation Shoot in October 2010 presented a particular challenge to a using a digital camera. I was taking pictures of Dan G. using his black powder muzzleloader. There is a noticeable lag in a digital camera between the time you press the shutter release button and the actual picture taking (due to camera auto focus and setting shenanigans). Yes there are tricks to reduce the lag time, but I still could not perfectly time my shutter with the split second after the boom to capture the smoke cloud when the bullet had just left the muzzle.
Plan B. Turn on the digital camera's movie mode and capture the few seconds around the actual shot. That gave a movie which was only a few seconds long and it successfully included the exact picture I wanted. But even filmed at low resolution, the movie was a pretty huge file -- much too big to use on the website (it would use the same computer resources as more than 100 typical still pictures).
Extracting a still picture from a movie file. There are lots of free or sometimes expensive computer programs out there that can do this. I've tried several and now just use the free Microsoft Windows Movie Maker. Took only a short while to step through the movie frame by frame near the shot moment and select and save the still picture I wanted.
Getting the images to the computer. Your digital camera will have its own instructions, but typically here are two ways I use:
--- (making sure I have a charged battery first) connect camera to computer by USB cord and then turn on camera and use Windows Explorer (a file management program) to copy the files to a new directory made for this event; or
--- remove memory card from camera and plug it into a card reader on the computer and copy files as above.
Organization of the particular digital images used on the website. This is not a trivial task, as there can be many pictures to choose from. All the new pictures are now in the particular event's new file directory. I make an additional new directory called [event name] Select. I make a copy of the selected photos I am going to use and place the copies here. It is not necessarily a final choice, but fairly close. The photos are rearranged to tell a story and then renamed to reflect the date and event name and a story photo sequence number. They are not necessarily in the sequence shot by the camera, and the camera's automated photo numbers are neither needed nor relevant to my needs here. Important: many website host servers require that every file used have the complete name including file extension in small letters, or the file will not display.
Photo Processing. Each photo in turn is subjected to manipulation in a photo program. I have several commercial programs including Photoshop CS2, Corel Paint Shop Pro, Corel Photo-Paint, and Photoshop Elements 10. The absolute best bargain in the bunch is Elements, which has most features of professional editing programs for a fraction of the price -- and is much friendlier to use. And there are freeware programs out there that will handle routine tasks. All the photos I (Banacek) took for this website were completely processed with Elements. In some cases, Elements was also used to fine tune photos contributed by others. Elements made all thumbnail versions. The steps I typically use are described here.
Rotate the photo if not perfectly horizontal.
Correct distortion if prominent objects with straight lines were made curved by the camera lens.
Crop to remove excess background or material. Up until 2010 I used to use the crop ratio of 4 X 3 which was useful later if the final image was to be the common 640 X 480 pixels traditionally used for a webpage. (It was also the ratio of the original picture file as taken by my camera, and most non-SLR digital cameras out there.)
But lately I have cropped most pictures used for the website to the ratio of 6 X 4 which is the same 6 inches X 4 inches ratio as in the typical snapshot paper used for printing at your local photo store. (If the picture format was vertical in the first place, the crop ratio used is 4 X 6.) A high resolution version at 6 X 4 ratio is saved on my computer, and the low resolution file at usually 660 pixels by 440 pixels size is displayed on the website. Then if a NOSA member wants to print some of the photos they see here, they only have to ask in an email to the webmaster, and I will email back the higher resolution version -- which will give a much better quality paper print. When my new (2011 and later) standard image crop ratio matches the print's paper ratio, no parts of the image mysteriously disappear during the printing process.
Sometimes the photo needs a different custom crop ratio, particularly for a wide scene. In any case I want the final image size to fit on a typical size computer screen without making the viewer have to scroll to see it all. 800 pixels wide is pretty well a practical maximum, and something over 600 wide is the norm just to be big enough for good viewing.
Why the low resolution version for the website? All picture files are displayed on computer screens at 72 or 96 pixels per inch, which means you can only see a tiny part of a high resolution picture and have to scan way over, and way down, to see the rest of the picture. (Not nice, as you have undoubtedly observed when folks put high resolution pix inside their emails.) A 660 X 440 pixel picture displays just fine, and uses very little of the expensive website storage space. It also loads quickly on computer screens even if the user has slow dial-up access to the internet.
Retouch photo as needed using various program tools. Outside pictures don't normally need a lot of this, but sometimes there are facial blemishes or bad shadows or extraneous junk in the picture that can be cunningly vanished. The camera facing towards bright sunshine can cause bright spots or flares in the image due to reflections within the camera lens elements. Sometimes they can be avoided with a lens shade, or even shielding the camera with a hat, but often they are not noticed until long after the picture has been taken. If that particular picture is important, the flares can be reduced in the photo program enough to be less distracting, but probably not eliminated.
Indoor pictures can take a lot longer here, whether flash was used or not. Additional problems can include colour fringes around people, very deep shadows, white spots from camera "noise" at low light levels, glare from flash or interior lights, colours distorted by the type of available lighting, and an enormous amount of junk that must be vanished so people don't look like stuff is growing out of their heads. Sometimes stuff is vanished to make a better composition. Intruding bits of passers-by can be vanished. Old signs (for our guest vendors or exhibitors) can be cleaned up and text sharpened. Irrelevant commercial signs can be vanished. And so on. Takes as much time as I have patience.
If satisfied with the result so far, I now apply the program's automatic picture enhancement and see whether I like the effect.
Then apply a custom modification of shadows, highlights and mid tones as needed.
Finally I apply a bit of sharpening (prior procedures could have affected original picture sharpness).
Note: After any step in the modification process, I can quickly step the program backward and forward if I need to see whether that particular step noticeably improved the picture. Yes the entire process takes some time, but you get quicker with experience.
Each photo's copy I am working on is still in the Selected [for the particular event] folder and is now saved there with all its refinements.
Where's the Automation? Those of you with computerized photo processing experience are probably wondering why I have not used macros or "actions" here. (A macro or "action" as they are called by the Adobe company allows the user to record a series of his program steps and then save it. This action can then be applied automatically to a whole series of photos, potentially saving lots of time.) They work okay where all the pictures were taken under the same lighting conditions and pretty much need the exact same things done to improve them. Unfortunately you cannot automate custom cropping; and there are enough different needs in various photos taken for a website (or at least for this website) that a canned solution would do a very mediocre job. If you shoot 80 vacation snaps and don't need to crop them and just want a quick generic improvement before getting prints at the local drugstore, actions are fine.
Now use the Save For Web program function. This menu gives me the opportunity to reduce the final photo to 660 x 440 pixels (or something reasonable for viewing on a webpage without scrolling) and reduce the resolution so the final webpage copy file size usually stays under 70 kb. The actual webpage copy's save is made to a completely different file folder where I keep all the final pictures for NOSA for the current year. I close the working file copy [still in the Selected event file folder] now without saving further changes. This way the larger working file with all the photo program enhancements is not changed or overwritten, and could still be manipulated or used differently.
Now to make a thumbnail photo image. The Club Pictures webpage displays only small (usually under 2 kb) thumbnail versions of the pictures so that the page will load quickly in any computer. Clicking on the thumbnail brings up the larger main image. Making thumbnails can be an easy task depending on which program you use, but our webpage code setup needs a special thumbnail. I use a table format on the page to hold the thumbnails, and the results will be very sloppy if the thumbnails are not all exactly the same size.
You ask: "How can they all be the same size when some pictures are horizontal, others are vertical, and some photos have different aspect ratios?"
First Method. We are going to make all photos temporarily into squares, and then into square thumbnails. Reopen each picture already finalized for the website and use the menu Image-Resize-Canvas Size to add a white band on either side of the image where needed to make the overall canvas square. Now use Save For Web to save a new size 100 X 100 pixel version at low (10) quality so the file is usually under 2 kb; during the save give this thumbnail file the original file name with _th added before the .jpg ending. Then close the original file without saving changes.
The extra steps to make square thumbnails became onerous, particularly when dozens of photos were needed for one event. The second method has much less work. No white borders are needed.
Second Method. We are going to make thumbnail versions with exactly the same aspect ratio and size no matter what the original ratio or orientation is. Assuming the photos are in the horizontal 6 X 4 aspect ratio, say 660 X 440 pixels, use Save For Web to save a new size 100 X 67 pixel version at low (10) quality so the file is usually under 2 kb; during the save give this thumbnail file the original file name with _th added before the .jpg ending. Then close the original file without saving changes. As for the photos that were portrait/vertical or had a different aspect ratio, simply open the 440 X 660 image (or whatever it is), but using a 6 X 4 crop ratio, choose a relevant small portion of the photo to keep for the thumbnail. Save this re-cropped-to-horizontal version of the thumbnail exactly as above. Presto all thumbnails are the same size. When someone clicks on the horizontal thumbnail version of what was a vertical picture, the larger vertical one opens and they'll get a pleasant surprise.
There are 4 versions of the photo. Just to make clear the location of copies, what they are and where they are:
(a) the original untouched copy as it came out of the camera is in the named event folder on my computer;
(b) an additional copy of a that that I plan to enhance for the website goes into the event's Selected folder, is enhanced in the photo program, and saved here with all its changes;
(c) the b copy is reduced in size with the Save For Web function to the dimensions and resolution needed for display on the website and this c version is saved into the local computer's directory that will be used for the website version of the pictures; the b version (still in its Selected event directory) is closed without saving changes;
(d) the c copy is opened in the photo program, and then Saved For Web to a tiny thumbnail with _th included in its name and this d copy goes into the same directory as the c copy.
Later the c and d copies will be FTP (File Transfer Protocol) uploaded to the website hosting service's directory for pictures for that particular year.
If you process dozens of photo files like this, accidents will eventually happen as you go into auto-dazed mode and sometimes you overwrite a file. Good thing you kept an untouched original version of the camera's file in a separate directory on your computer, right?
The only things left to do now are: create a new section and photo table in my computer's copy of the Recent Activities webpage code, insert the names of the photos and thumbnails, write captions, remove the event from the Upcoming Activities page, write up the event detailed happenings for the Recent Activities webpage, change the index page's update date, FTP (File Transfer Protocol) all the new or changed files to the website server, and write and send an email to all the club members (who admit to having an email address) telling them about it. Yikes !
You/I/We might start to wonder whether these several hours (the record is well over 10 hours) of photo and webpage stuff after the event take a bit of fun out of it. No, I actually like this stuff, although sometimes I kinda wish there were fewer photos to process. But no, that would not serve the interests of the club. However, taking pictures and doing volunteer work at these events does keep me busy and sometimes I can't see or photograph everything interesting that happens.
As for whether club members are frequenting this site, so far the counter software results show most NOSA members with computers are likely coming here once or twice a month, which is fairly normal for a primarily club-oriented website. I used to run another website that took about the same amount of time and had up to 2000 visitors a month. Go figure.
I have taken pictures at indoor shoots where lighting was good and I never used or needed flash. If the ambient lighting were dark and unfriendly to photography, the shooters would be even more unfriendly if I flashed and fried their vision .... on the other hand, if they were blinded they couldn't .... nah, bad idea.
Aerial Photos at Nolalu Outdoor Range
On 10 October 2010 Banacek took some aerial photos of the NOSA outdoor ranges at Nolalu. During filming all the ranges were green, with no firing taking place on any range.
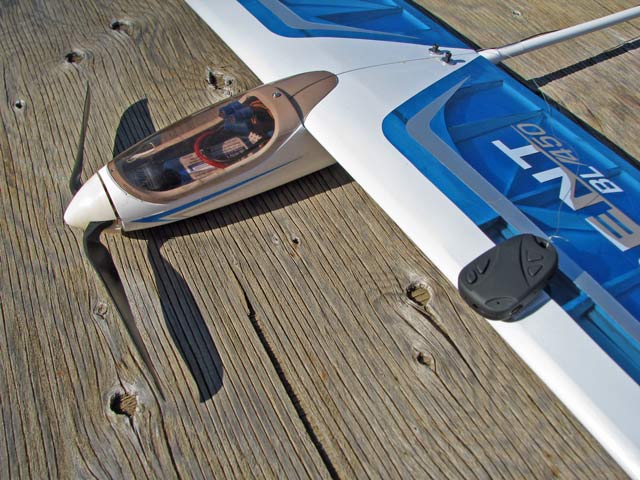
Click on the thumbnail picture here for a larger image. The black device mounted on the wing is a miniature camera capable of taking digital videos in colour with sound. The movie can be about 15 minutes long. The camera can also take still pictures by manually pressing a button, but movie mode was used here. The camera is turned on just before launching the aircraft. Later the still pictures were extracted from the video in the manner described above on this page.
The camera imposes a date-time stamp on all still pictures and most frames of its videos. There is no way to turn off that feature on this particular camera.
Viewed from the ground, the plane's attitude and bank are impossible to judge or maintain precisely, consequently a lot of video must be shot to extract a few worthwhile still pictures. And like with regular digital cameras, after the initial camera cost taking digital videos is free. This camera with 2 GB miniSD memory card was under $40. The picture quality is remarkably good considering the cost and size of the camera and the shooting circumstances.
The radio controlled airplane used here is an electric powered glider which has low vibration. The camera is wing-mounted to keep the lens clear of the propeller's arc. (While the propeller looks crooked here, it is not broken; it is a folding unit with the individual blades free to move backwards to reduce air drag when the motor is not running. :-)
Tips on Making Club or Personal Websites
Keeping It Simple. That task and I mean task! is not so simple in practice. One good reason to do so is the large part of your audience using older computers or slow dial-up internet connections. Junk code and music and excessive animations or large picture files will drive them away fairly quickly. They might forgive you one slow loading page, but page two will be bye-bye.
Club members here, and in general, are mostly older and more sophisticated, and do not take kindly to immature humour and the flash animations that might entrance a youngster raised on gaudy video games. Know your intended audience.
Website Construction Tools. Perhaps here is where I disagree with the hype about using "simple" webpage software. Word processing programs like Microsoft Word or WordPerfect brag that you can design a page there and simply save it in web format. Yes, but ... even a seemingly simple text page will end up with an incredible amount of garbage code in the web version. The viewer might not see it depending on the browser used, but it will soon add to the download time for the page and help fill up your storage space on the host server for your website. Such programs' code is often in conflict with new internet coding standards, and will be a nightmare to edit later with a different program.
Professional website programs are not much better. Yes professional website developers for whom time is indeed money will spend the big bucks for the convenience of a Dreamweaver or the like. Once the complexities of such programs are mastered, websites can be created or altered very quickly. But the code used is horrifically huge and bloated. While on the web look at the source code for any of the pages here, and then look at source code for a commercial site using "professional" tools. 5, 10, 20, or more times the file size, and unintelligible to any other software program. Once you buy one of these expensive toys, you will be locked forever into expensive annual upgrades and perpetual bug fixes.
Or Use a Simple (But Not Crude) Text Editor. If your experience with text editor software has been limited to primitive ones like Notepad, you will be pleasantly surprised by others like the free version of NoteTab that I have used for many years to make and maintain several websites. The files it produces are lean and easily comply with the latest international web code standards. It has a lot of simple tools to convert your typed content into web code. Combine that program with a basic how-to book like HTML Visually and you will soon have a working web page and web site. It really is not rocket science. Just pay attention to details and all will go well. If a page ever does not work, you can check your code with a test site on the web that will flag errors. And there are hundreds of websites out there that will help, including a user group for NoteTab HTML website development at Yahoo.
Before Going Live on the Web. While a page is under development on your computer, a program like NoteTab has a built in command to let you see the page as it would appear in a browser. Problems are easy to see, and alternative code and different results are easily compared. Links and menu items internal to your draft website and as seen in the browser will launch the webpage concerned from your computer. Any glitches will show up here, long before you upload the web files to your actual website. Only you will ever know what went wrong during testing and development. Later the world will see a glitch-free live website.
One Cardinal Rule. Whether you are doing a website or a newsletter, do your very best to spell everyone's name correctly.
So what are you waiting for?
Coming Next?
Next time? It's reasonably certain that I'll eventually be subject to a bad head cold or a snowstorm that keeps me indoors to write some more here. I have other photography tips too.
And if you get the chance, please write to me at the website to say whether this was of any use to you. Since this article was first published (it has been updated several times since) exactly one person has bothered to comment on it. Is it really useful to others keeping this file updated? Only you know for sure.
You take care now.
back to Table Of Contents for Member Ramblings
Warning and Disclaimer. Only the most current printed Shooting Rules and Range Standing Orders and Match Standing Orders as issued by the N.O.S.A. Executive are official and they should be read, understood, and followed. If there is any question as to interpretation of a rule, or safety of a practice, immediately ask a member of the Executive or a Range Safety Officer before placing yourself or anyone or anything else at risk. Any activity involving firearms has inherent dangers. Some contents on this website may include personal opinions and experiences or practices that should not be emulated. Everyone viewing this website, or any other website or book or magazine or pamphlet or media source, is cautioned to seek professional advice first about anything written or implied or inferred. Your safety is your personal responsibility.
Copyright © 2021 New Ontario Shooters Association. This site is copyrighted and no content may be reproduced by any means, including electronic, without written permission except for strictly personal use. Other websites wishing to post a link to this site are welcome to do so.